Publishing an npm package to Sonatype Nexus
Parameters for publishing an npm package. Creating an npm repository in Nexus, registering a user, and configuring Realm.
Setting up a build in Vite
Example vite.config.ts with vite-plugin-dts plugin for exporting TS types:
import { defineConfig } from 'vite';
import react from '@vitejs/plugin-react';
import dts from 'vite-plugin-dts';

export default defineConfig({
  plugins: [
    react(),
    dts({
      rollupTypes: true,
      tsconfigPath: './tsconfig.app.json',
    }),
  ],
  build: {
    lib: {
      entry: 'src/components/index.ts',
      name: 'MyComponentLibrary',
      fileName: (format, name) => `${name}.${format}.js`,
    },
    rollupOptions: {
      external: ['react', 'react-dom', '@mui/material', '@emotion/react', '@emotion/styled'],
      output: {
        globals: {
          react: 'React',
          'react-dom': 'ReactDOM',
          '@mui/material': 'MaterialUI',
          '@emotion/react': 'EmotionReact',
          '@emotion/styled': 'EmotionStyled',
        },
      },
    },
  },
});
The bundle is placed in the dist/ folder by default.
The file name is defined in the build.lib.fileName callback and contains the module name and its format:
es— ESM module;umd— CommonJS module.
Project description in package.json
{
  "name": "My project name",
  "version": "0.1.0",
  "description": "My project description",
  "type": "module",
  "main": "dist/index.umd.js",
  "module": "dist/index.es.js",
  "types": "dist/index.d.ts",
  "exports": {
    ".": {
      "types": "./dist/index.d.ts",
      "import": "./dist/index.es.js",
      "require": "./dist/index.umd.js"
    }
  },
  "files": [
    "dist"
  ],
  "publishConfig": {
    "registry": "http://localhost:8081/repository/my-test-repo-hosted/"
  },
  "scripts": {
    "build": "tsc -b && vite build",
    "lint": "eslint .",
    "storybook": "storybook dev -p 6006",
    "build-storybook": "storybook build"
  },
  "devDependencies": {
    // ...
  },
  "peerDependencies": {
    "@emotion/react": "^11.0.0",
    "@emotion/styled": "^11.0.0",
    "@fontsource/roboto": "^5.1.1",
    "@mui/icons-material": "^6.4.0",
    "@mui/material": "^6.0.0",
    "react": ">=18.0.0",
    "react-dom": ">=18.0.0"
  },
  "eslintConfig": {
    "extends": [
      "plugin:storybook/recommended"
    ]
  }
}
Here in the exports field in the nested field .:
types— path to the bundle with types;import— path to the ESM bundle;require— path to the CommonJS bundle.
The publishConfig.registry field specifies the address of the npm hosted repository in Nexus.
Setting up Sonatype Nexus
1. Install and launch Nexus
Deploy Sonatype Nexus in a Docker container using these instructions: Sonatype Nexus installation using Docker
2. Enable Realm for npm

3. Create a role to read and write packages to the repository
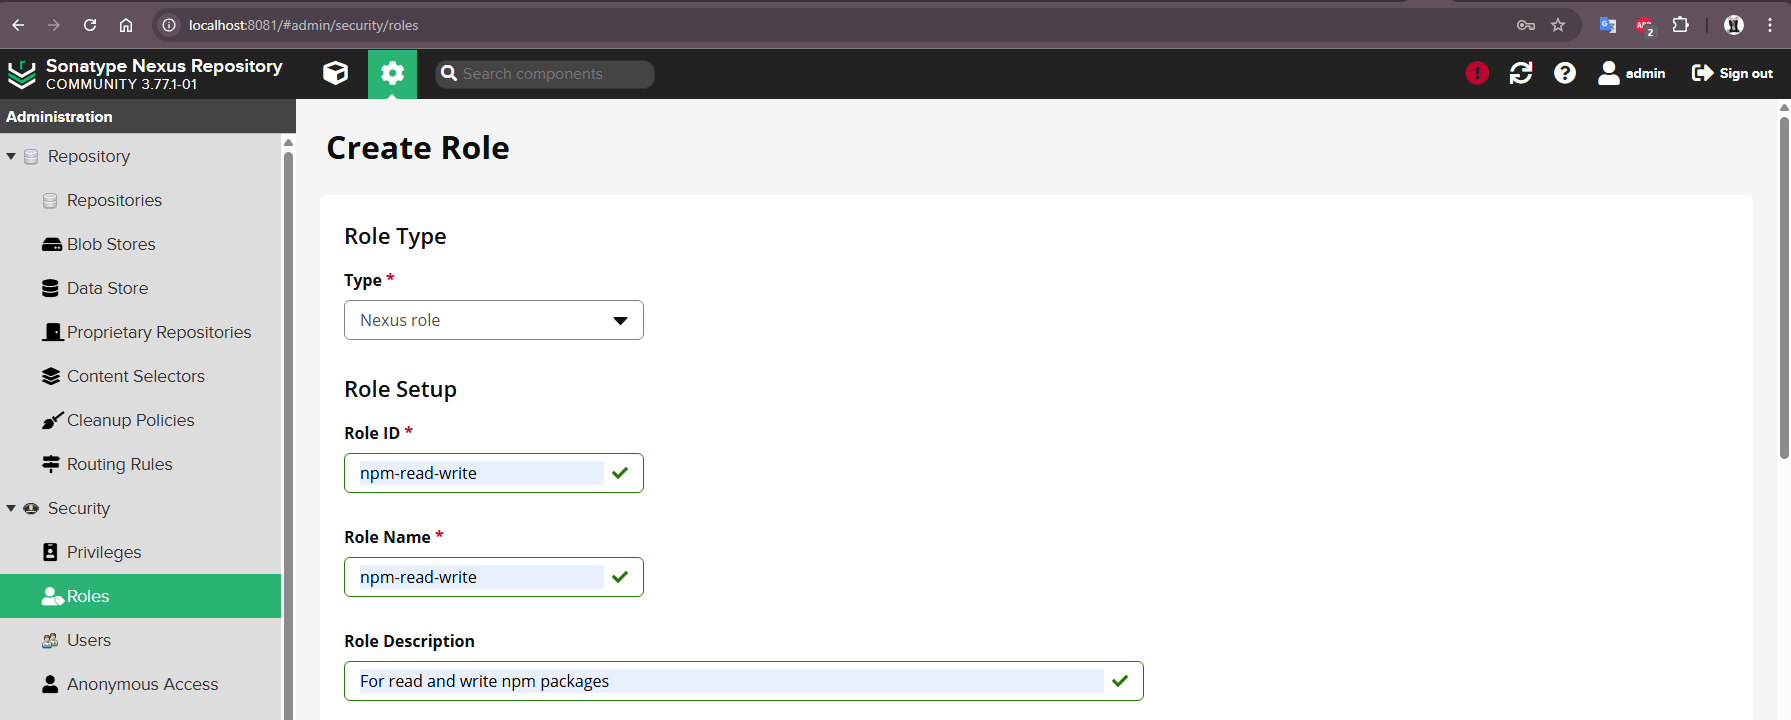
Open the role creation form:
- go to Security -> Roles
- proceed to role creation by clicking the Create Role button
- fill in the fields:
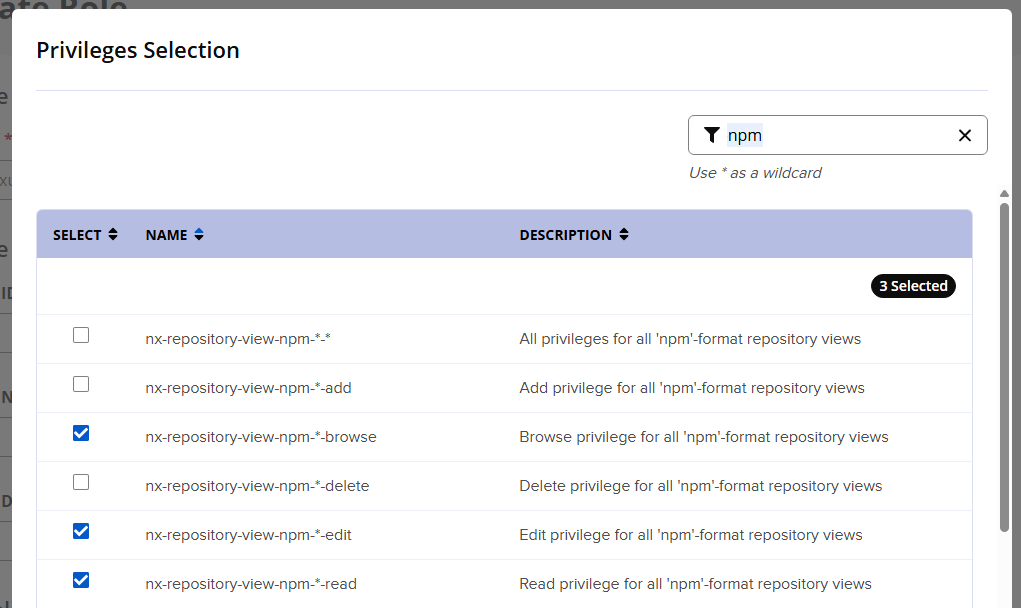
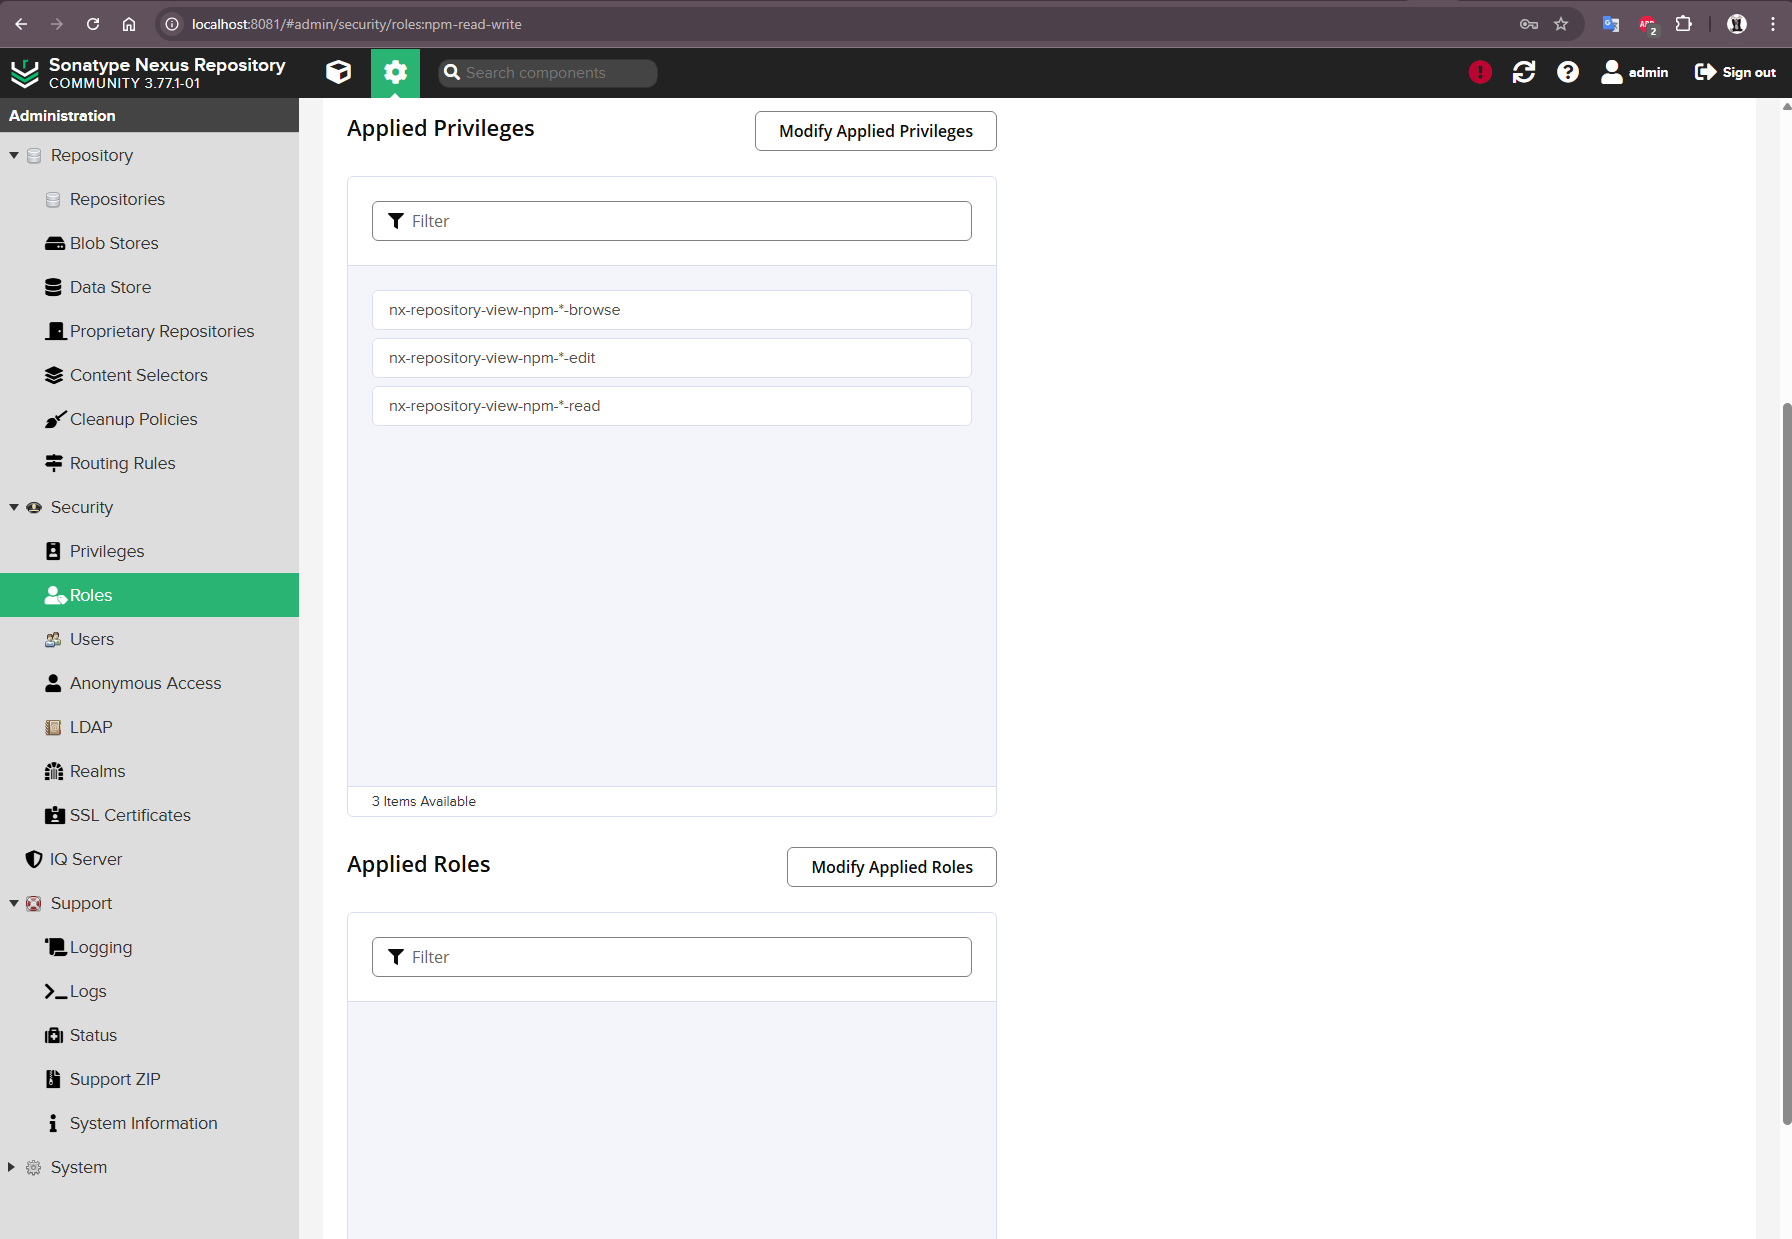
Below in the Applied Privileges section, to add privileges, click Modify Applied Privileges and filter the list that opens by the value npm, then select privileges:
nx-repository-view-npm-*-browsenx-repository-view-npm-*-editnx-repository-view-npm-*-readand save by pressing the Confirm button:
Leave the Applied Roles section blank:
Create a role using the Save button.
4. Create a user to publish the package
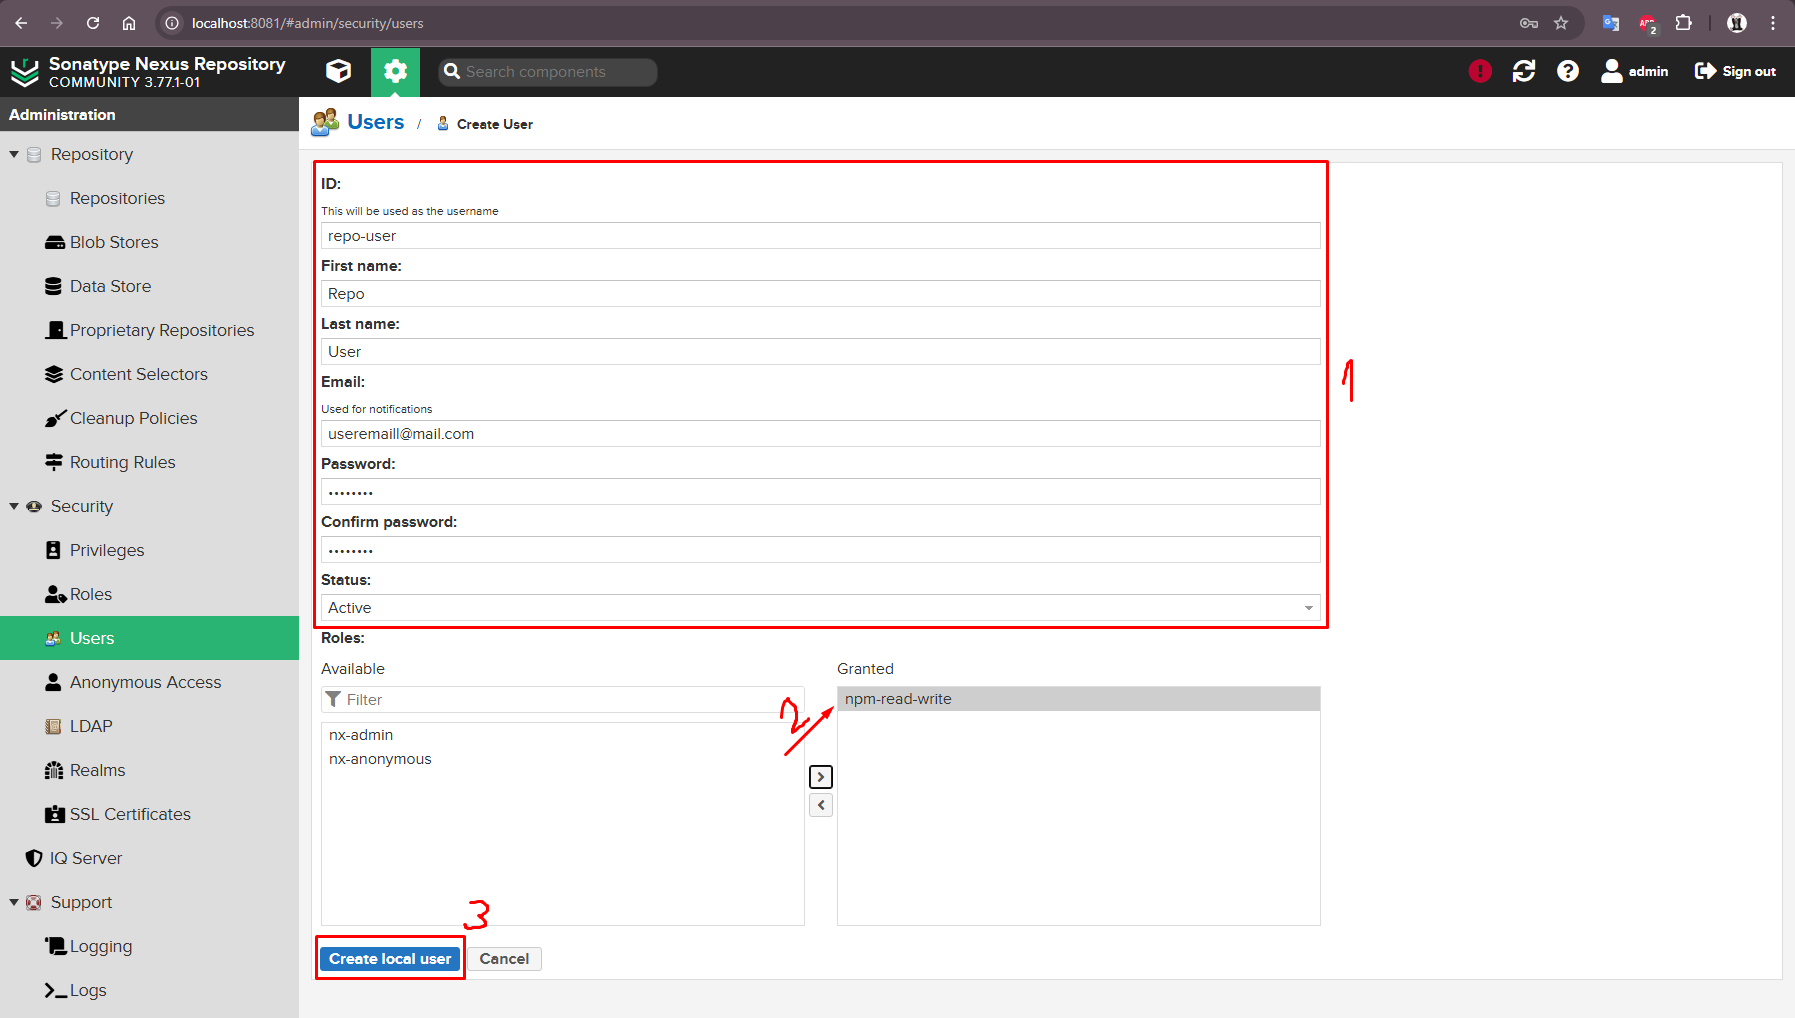
- go to the Security section -> Users
- proceed to role creation by clicking Create local user
- fill in the fields with user information
- at the end of the form, move the previously created role to the right column Granted
- create a user by clicking Create local user
5. Create repositories
3 repositories need to be created: proxy, hosted, and group:
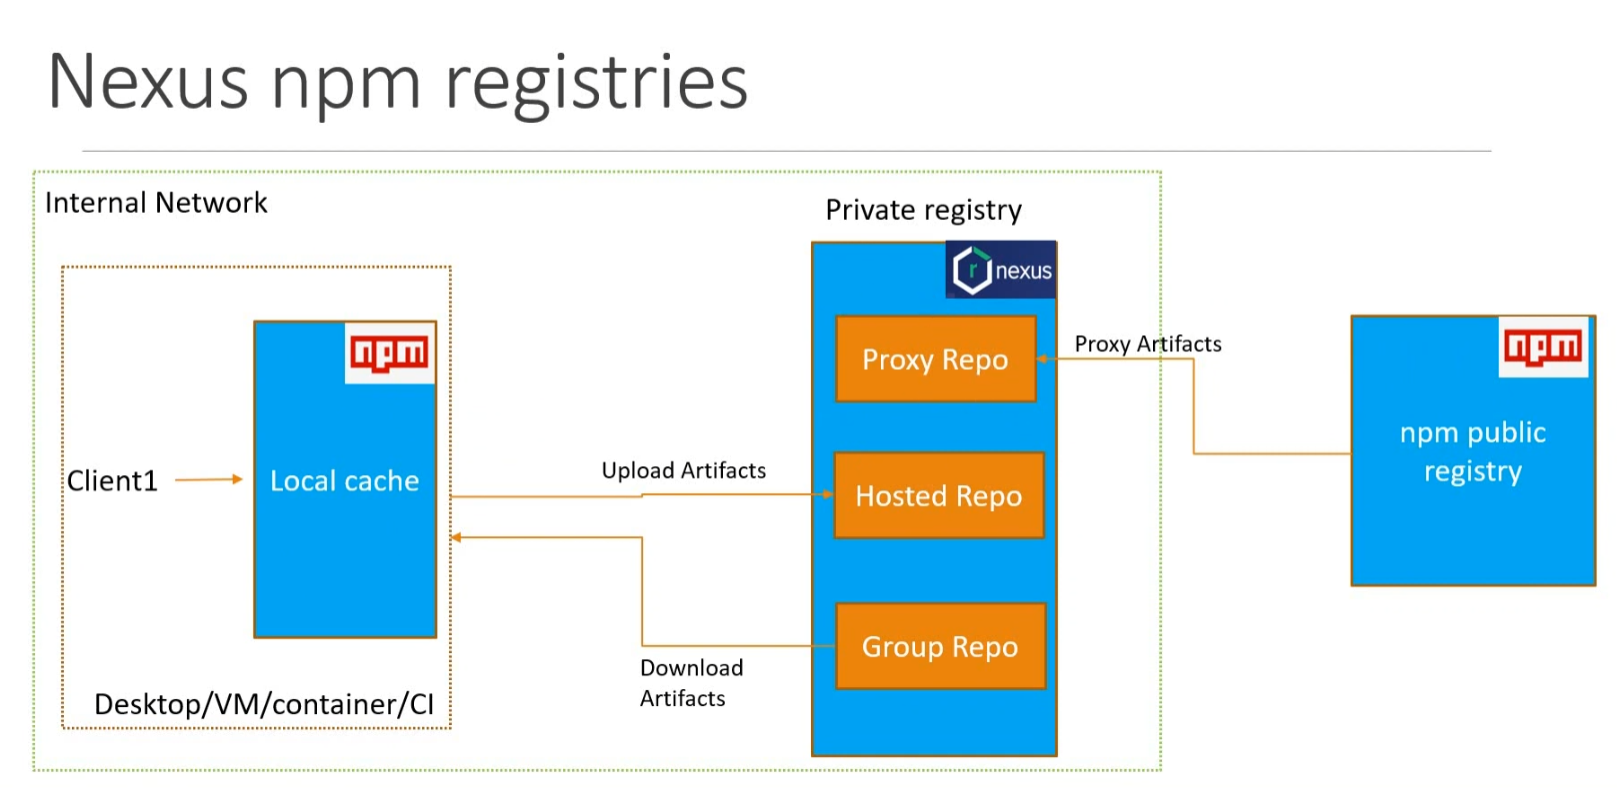
To create each of them you need:
- Go to the Repositories section -> Repositories
- Proceed to creating a repository by clicking the Create repository button.
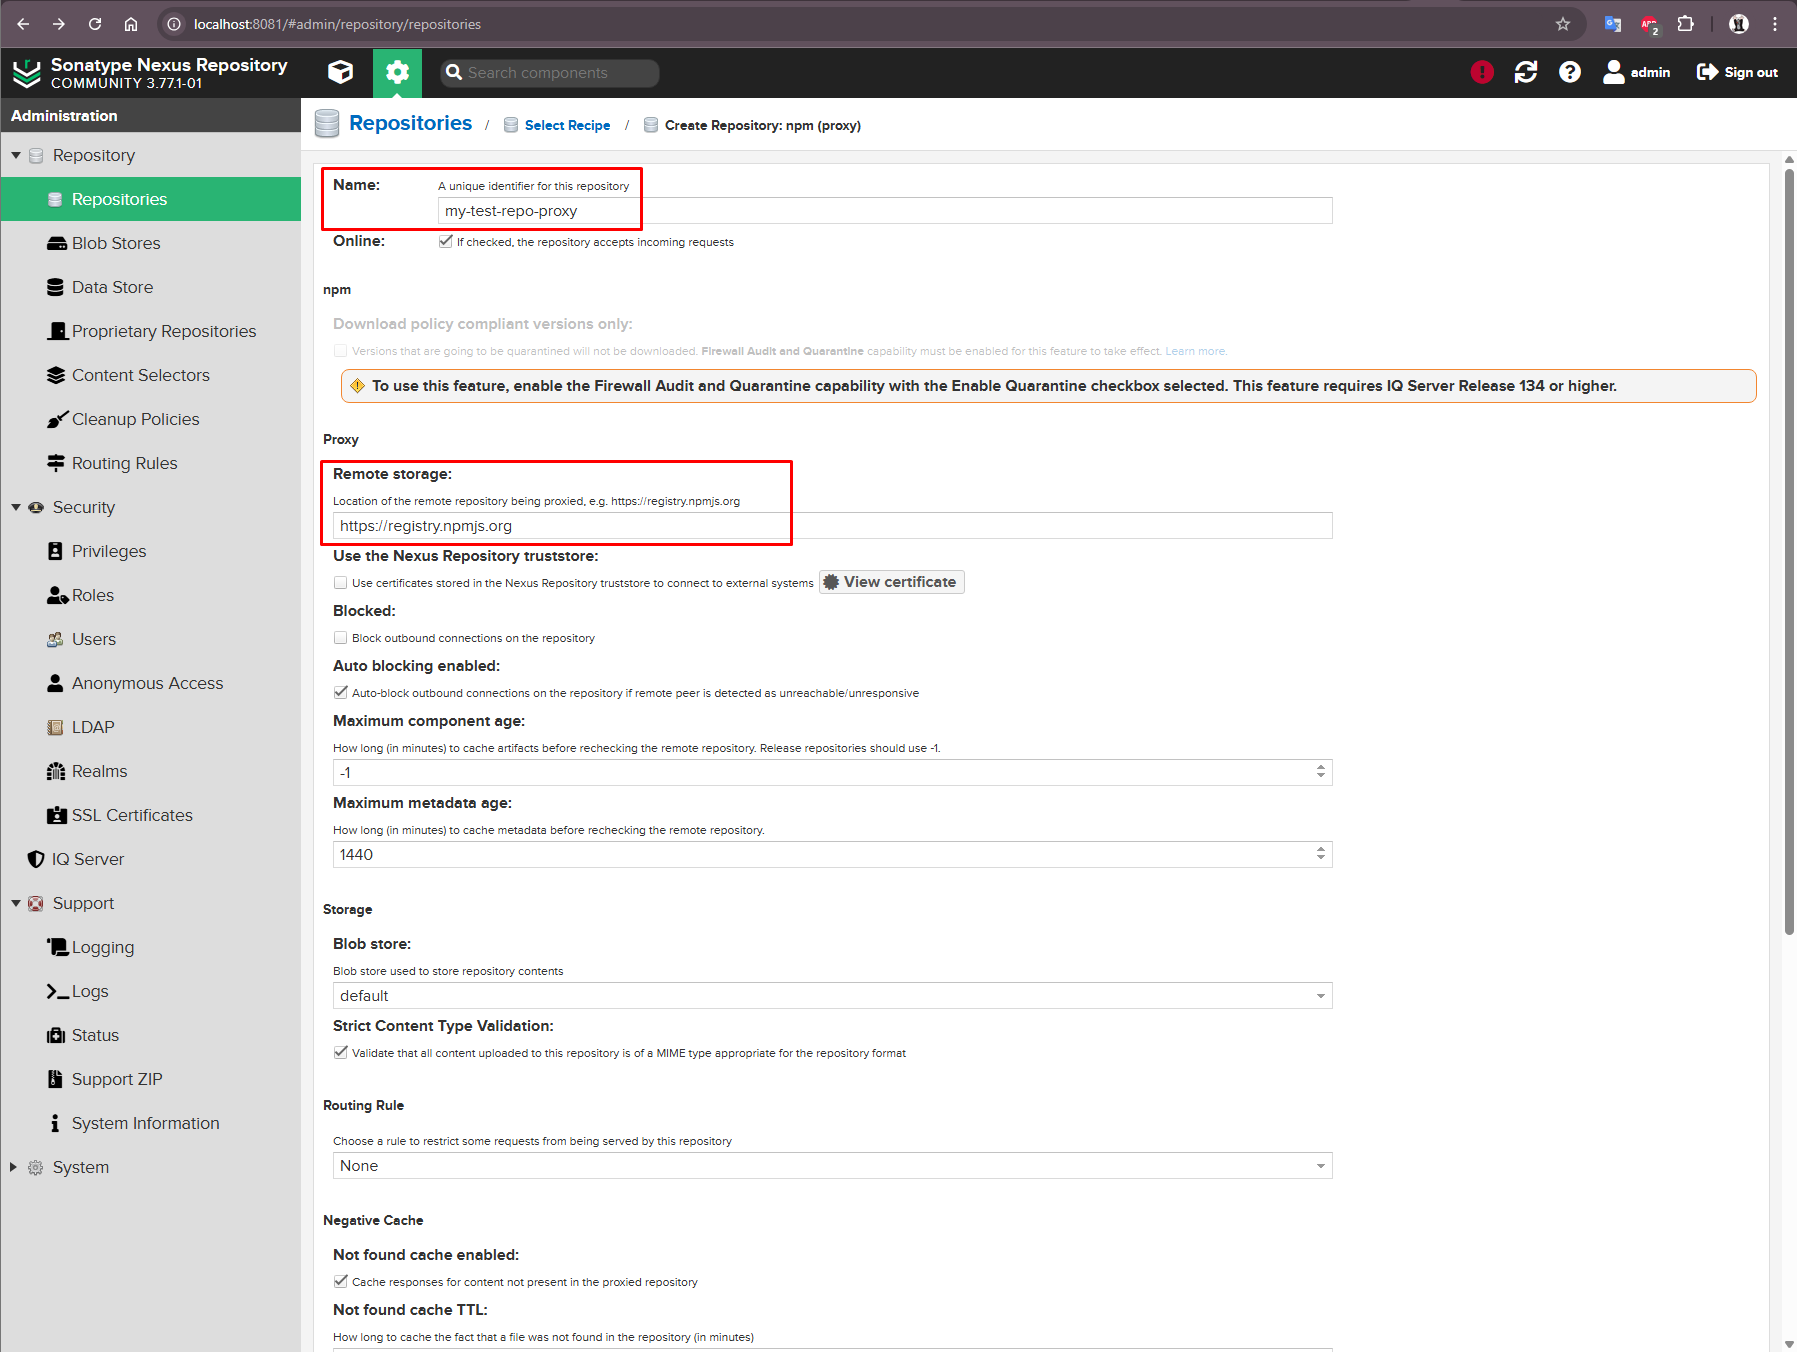
Proxy repository
In the Recipe list that opens, select npm (proxy) and fill in the fields:
- Name - preferred repository name (add "proxy" at the end for identification);
- Remote storage - the address of the remote repository with packages (enter the public address
https://registry.npmjs.org).
Leave the remaining fields as default and create a repository using the Create repository button:
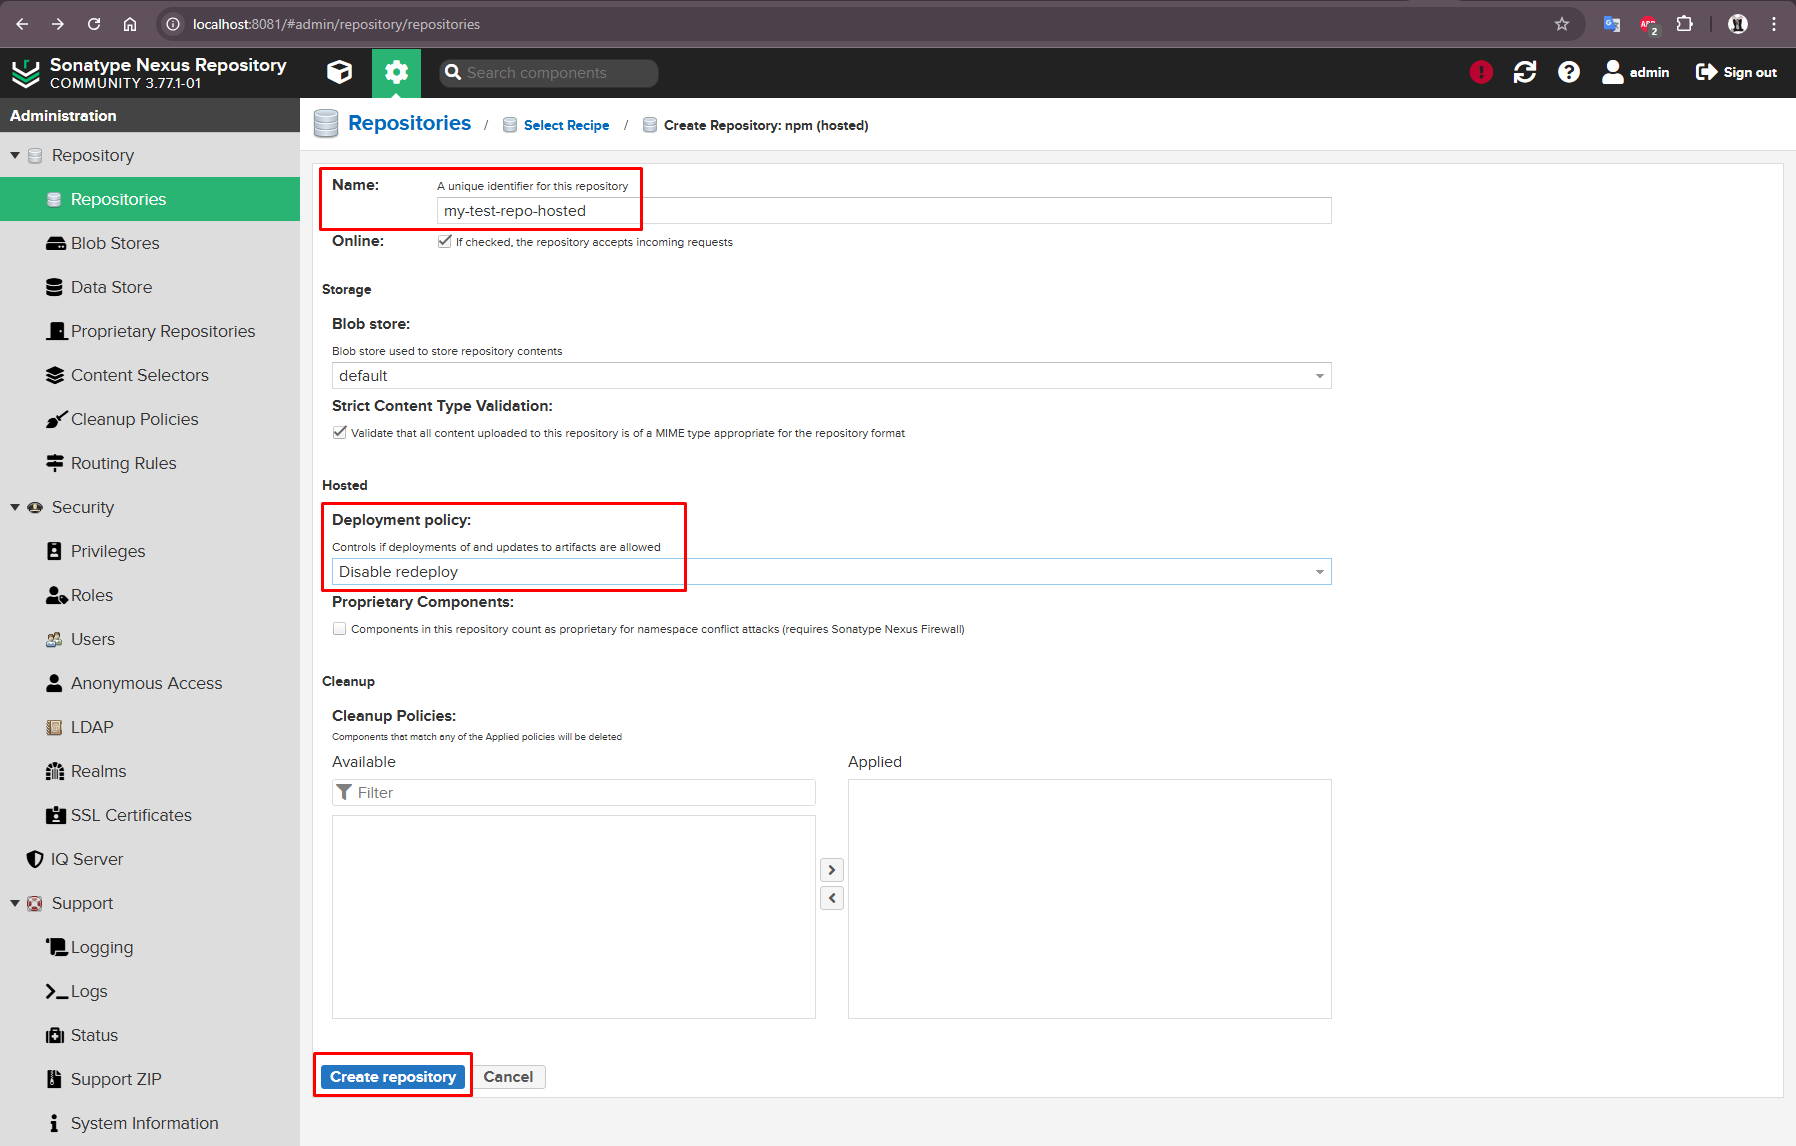
Hosted-репозиторий
In the Recipe list that opens, select npm (hosted) and fill in the fields:
- Name - preferred repository name (add "hosted" at the end for identification);
- Deployment policy - policy for redeploying the same version.
Leave the remaining fields as default and create a repository using the Create repository button:
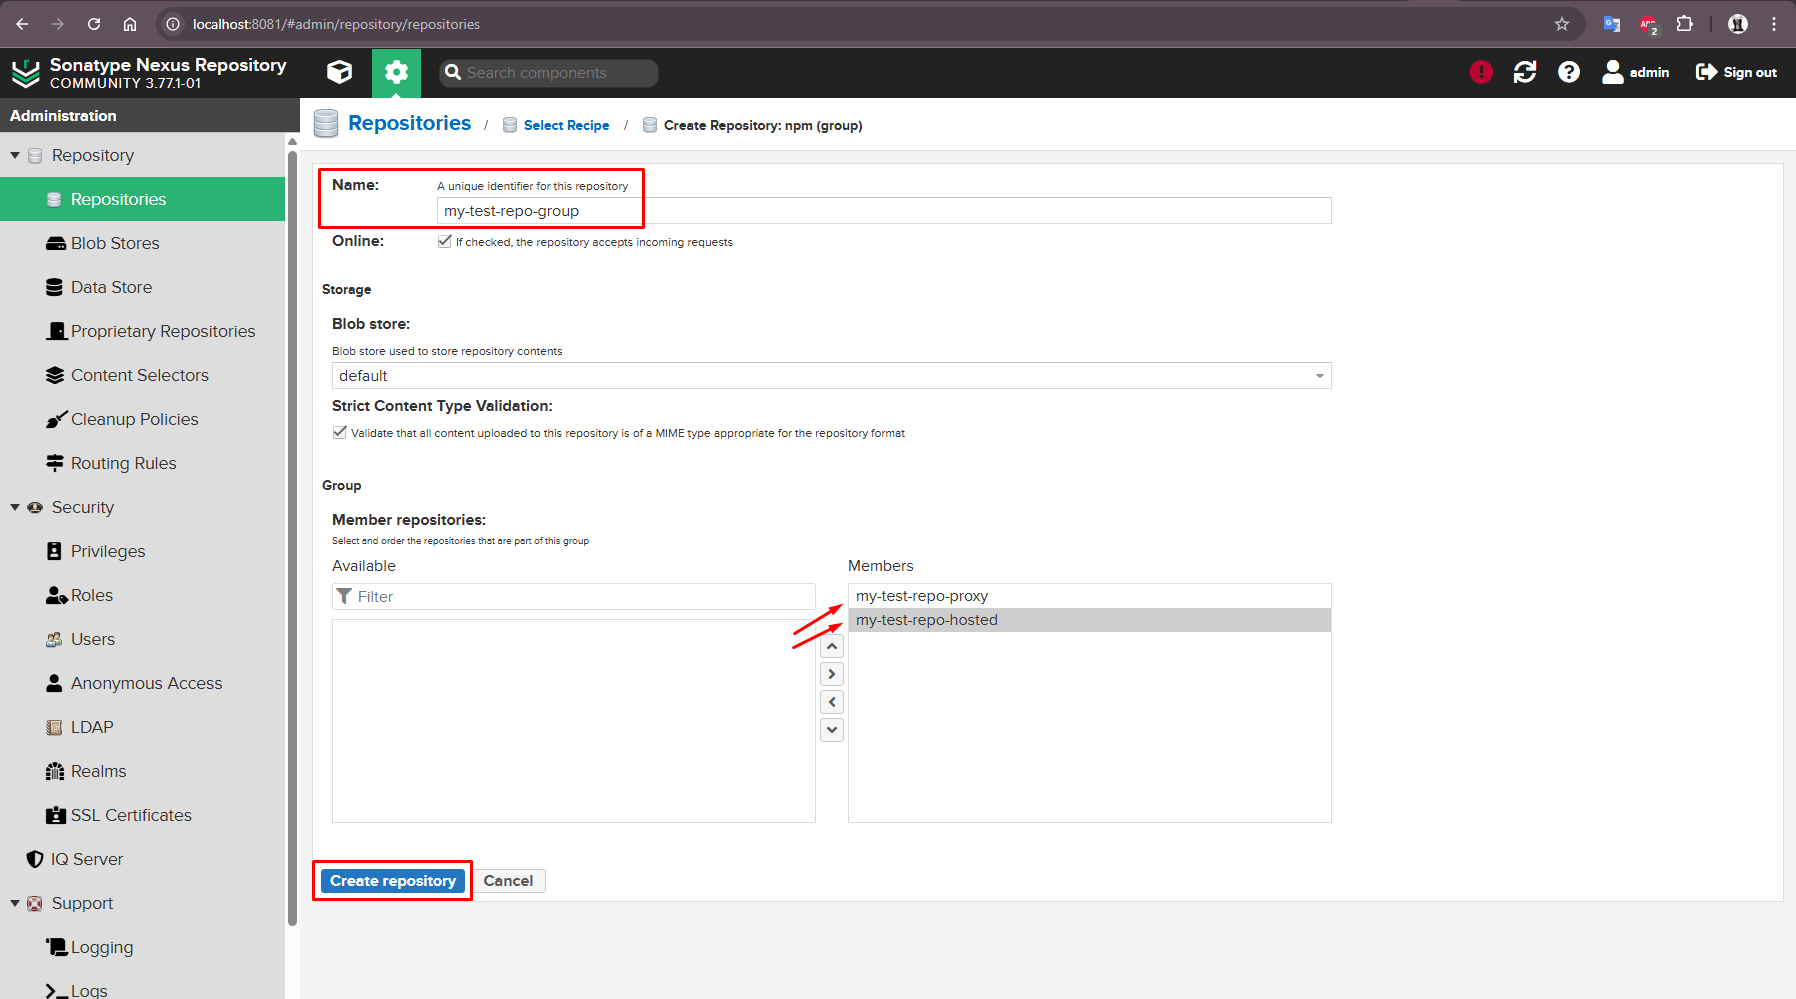
Group-репозиторий
In the Recipe list that opens, select npm (group) and fill in the fields:
- Name - preferred repository name (add "group" at the end for identification);
- Member repositories - list of grouped repositories. Drag newly created proxy and hosted repositories into the Members column on the right.
Leave the remaining fields as default and create a repository using the Create repository button:
6. Authorization in the npm repository
To authorize, execute a command like this:
npm login --registry=[repository-address]/repository/[hosted-repository-name]/
Attention!!! It's important to include the trailing slash / after the repository name in the command. For example, for a locally deployed Nexus:
npm login --registry=http://localhost:8081/repository/my-test-repo-hosted/
Repository credentials are stored in the .npmrc file. After authorization, a line like this appears in the file:
//[repository-address]/repository/[hosted-repository-name]/:_authToken=NpmToken.xxxxxxxx-xxxx-xxxx-xxxx-xxxxxxxxxxxx

If you have problems with authorization, remove the line from the .npmrc file and authorize again.
7. Publishing a package to an npm repository
To publish a package, first build the bundle:
npm run build
After building, run the following command from the project directory:
npm publish
When running this command without any additional parameters, the package will be published to the hosted repository specified in the publishConfig.registry field of the package.json file (see the example in the section Project description in package.json).
The address of the hosted repository for publication can be specified explicitly by adding the --registry parameter (don't forget the slash / at the end after the repository name):
npm publish --registry=http://localhost:8081/repository/my-test-repo-hosted/
8. Installing a published package in another project from the Nexus group repository
To install a package, you must explicitly specify the address of the group repository using the --registry parameter (don't forget the slash / at the end after the repository name):
npm install my-component-library@0.1.0 --registry http://localhost:8081/repository/my-test-repo-group/